Results 46 to 60 of 226
Thread: Photography How-to
-
18 March 2010, 07:19 #46
 New Member
- Join Date
- Mar 2010
- Location
- VA
- Posts
- 15
- Downloads
- 0
- Uploads
- 0
I took a trip to Home Depot this morning to pick up some supplies for my new photography project. Here's a preliminary run down of some results before I even built the light box.
The goods minus the 3/4" schedule 40 PVC. Total at HD was under $130:

The previous high speed 3-light setup with 200w bulbs (totally inneffective BTW since the temp of the bulbs is in the 2000K range:

I took several pictures of an early M1 Garand bolt using a Nikon D40 on auto. I've not touched up any of the shots. The first is of the bolt under the incandescent lighting. While it's not a bad shot, you can see the yellows and the shot just isn't bright."

I then changed out the bulbs in the high-speed 3-light setup and took the picture again using the florescent 100W bulbs at 5500K.
Here's the set-up:

Here's a picture with the hotter bulbs. I could immediately see a difference in the brightness with these bulbs:

Here's a light box set-up I bought at Ritz Camera. It's a nice collapsible box with fabric diffusers and a blue shooting matt (fabric). The problem was the crappy little lights provided that couldn't light a bug. You can see I placed just one of the 10" lights ontop (quickly) to take a picture:

Here's a picture of the bolt with just that one bulb on the top of the box. Not too bad:

Who knows what I might be able to do once I get the lighting down, learn how to use my camera and use a tripod! Thanks again for the tips and advice.
-
18 March 2010, 09:44 #47
Distinguished Member
- Join Date
- Nov 2007
- Location
- SE Florida
- Posts
- 1,113
- Downloads
- 0
- Uploads
- 0
When I look at the original photo at home the brightness looks like the one on the bottom. When I look at it at work I see what I imagine you're seeing as the top one looks too dark. Originally Posted by jeffy

Guess I should turn down my monitor at home.WWW.TACTICALYELLOWVISOR.NET
-
18 March 2010, 12:11 #48
Member
- Join Date
- Dec 2007
- Posts
- 172
- Downloads
- 0
- Uploads
- 0
I'd recommend adding two more lights from the sides to soften the shadow cast from the light above. The blue really looks nice and gives the bolt a more natural color. Green tends to come out a bit too bright. Originally Posted by Defender3
Maybe come at it at a lower angle and not so straight on. The creases are a bit distracting. You'll either want to add more wrinkles or flatten it out completely. If you want to see really nice lightbox photo's check out Ken Lunde's site. http://lundestudio.com. IIRC he set up his stuff on his couch which probably helps create the natural looking wrinkles.
-
19 March 2010, 19:56 #49
New Member
- Join Date
- Mar 2010
- Location
- VA
- Posts
- 15
- Downloads
- 0
- Uploads
- 0
Thanks for the link - I'll check it out. I couldn't attach any other lights to the Ritz rig so I took that one shot just to see the difference with that hotter bulb. And yes, I'll have to iron out some of those wrinkles! I'll post additional shots as I progress. Originally Posted by jeffy
-
19 March 2010, 21:06 #50
Member
- Join Date
- Dec 2007
- Posts
- 172
- Downloads
- 0
- Uploads
- 0
You don't need to hang additional lights to the rig itself. They just need to be pointed towards the sides. Adding a brighter bulb will just make the shadows more defined. You could try using a speedlight(external flash) and have it bounce off the back of the box as well to try to lighten up the shadows as well. Originally Posted by Defender3
Here's the direct link to Ken's wallpapers. http://lundestudio.com/firearms.html
-
19 March 2010, 21:58 #51
Administrator
- Join Date
- Jun 2007
- Posts
- 5,596
- Downloads
- 0
- Uploads
- 0
D3- Or just use a piece of colored paper.
-
21 March 2010, 07:08 #52
New Member
- Join Date
- Mar 2010
- Location
- VA
- Posts
- 15
- Downloads
- 0
- Uploads
- 0
Here's a picture using the already mentioned Ritz light box. I placed the PVC frame (3/4" PVC) around the box and hung three 10.5'" reflectors on the frame, on one top and one on each side. The piece is slightly elevated using a foam pillow and shot with a Nikon D40 on a tripod and auto. Thanks for the help guys as this is much better than what I was experiencing previously! FWIW - the part is an early numbered lower band for the M1 Garand.

Last edited by Defender3; 21 March 2010 at 08:45.
-
21 March 2010, 13:23 #53
Member
- Join Date
- Dec 2007
- Posts
- 172
- Downloads
- 0
- Uploads
- 0
I'd recommend you move the ISO from 400 to maybe 100 if you can. Since you're shooting from a tripod, you can go with a longer exposure to help compensate for the lower ISO. This will also help sharpen the detail. The focus seems to be a few MM's in front of the band your trying to focus on. The C and the 0 on the ends are noticeably blurry. I'd decrease the aperture size to increase the depth of field so more in in focus. Originally Posted by Defender3
-
26 March 2010, 07:04 #54
Member
- Join Date
- Mar 2010
- Posts
- 7
- Downloads
- 0
- Uploads
- 0
That's the "memory stick". Originally Posted by motorolahamm
-
11 April 2010, 08:25 #55
Distinguished Member
- Join Date
- Nov 2007
- Location
- SE Florida
- Posts
- 1,113
- Downloads
- 0
- Uploads
- 0
too bright now? this is natural light, cloudy day
 WWW.TACTICALYELLOWVISOR.NET
-
11 April 2010, 08:26 #56
Distinguished Member
- Join Date
- Nov 2007
- Location
- SE Florida
- Posts
- 1,113
- Downloads
- 0
- Uploads
- 0
I'm thinking that I might be better off buying a thin sheet of plywood and leaving it outdoors to get that grey weathered look as it might cause me less contrast issues with the dark gun(s)?
WWW.TACTICALYELLOWVISOR.NET
-
11 April 2010, 12:49 #57
Member
- Join Date
- Dec 2007
- Posts
- 172
- Downloads
- 0
- Uploads
- 0
If you play around with the contrast and brightness you can correct the exposure to some extent. You might try shooting on a some 1/4" High Density Fiberboard. Plywood has too much grain that it would be distracting. You might also consider shooting on your garage floor as you will not get as much direct light.
Maybe try dropping the ISO a bit or increasing the shutter speed.
You can also try using some post-processing with Lightroom, Photoshop or Element as well. Drop the brightness a little and maybe raise the contract a bit.
-
10 April 2011, 12:18 #58
Distinguished Member
- Join Date
- Jan 2008
- Location
- CA & WA
- Posts
- 1,162
- Downloads
- 0
- Uploads
- 0
I've learned alot from this page. My funny visit to the monkey crew, I love this door art work.

-
10 April 2011, 17:43 #59
Contributing Member
- Join Date
- Oct 2009
- Posts
- 237
- Downloads
- 0
- Uploads
- 0
Rob, I purposely shoot on a piece of white wall covering and blow the background out for a high-key look. It all depends on what you're looking for... Originally Posted by rob_s
-
11 April 2011, 03:16 #60
Distinguished Member
- Join Date
- Nov 2007
- Location
- SE Florida
- Posts
- 1,113
- Downloads
- 0
- Uploads
- 0
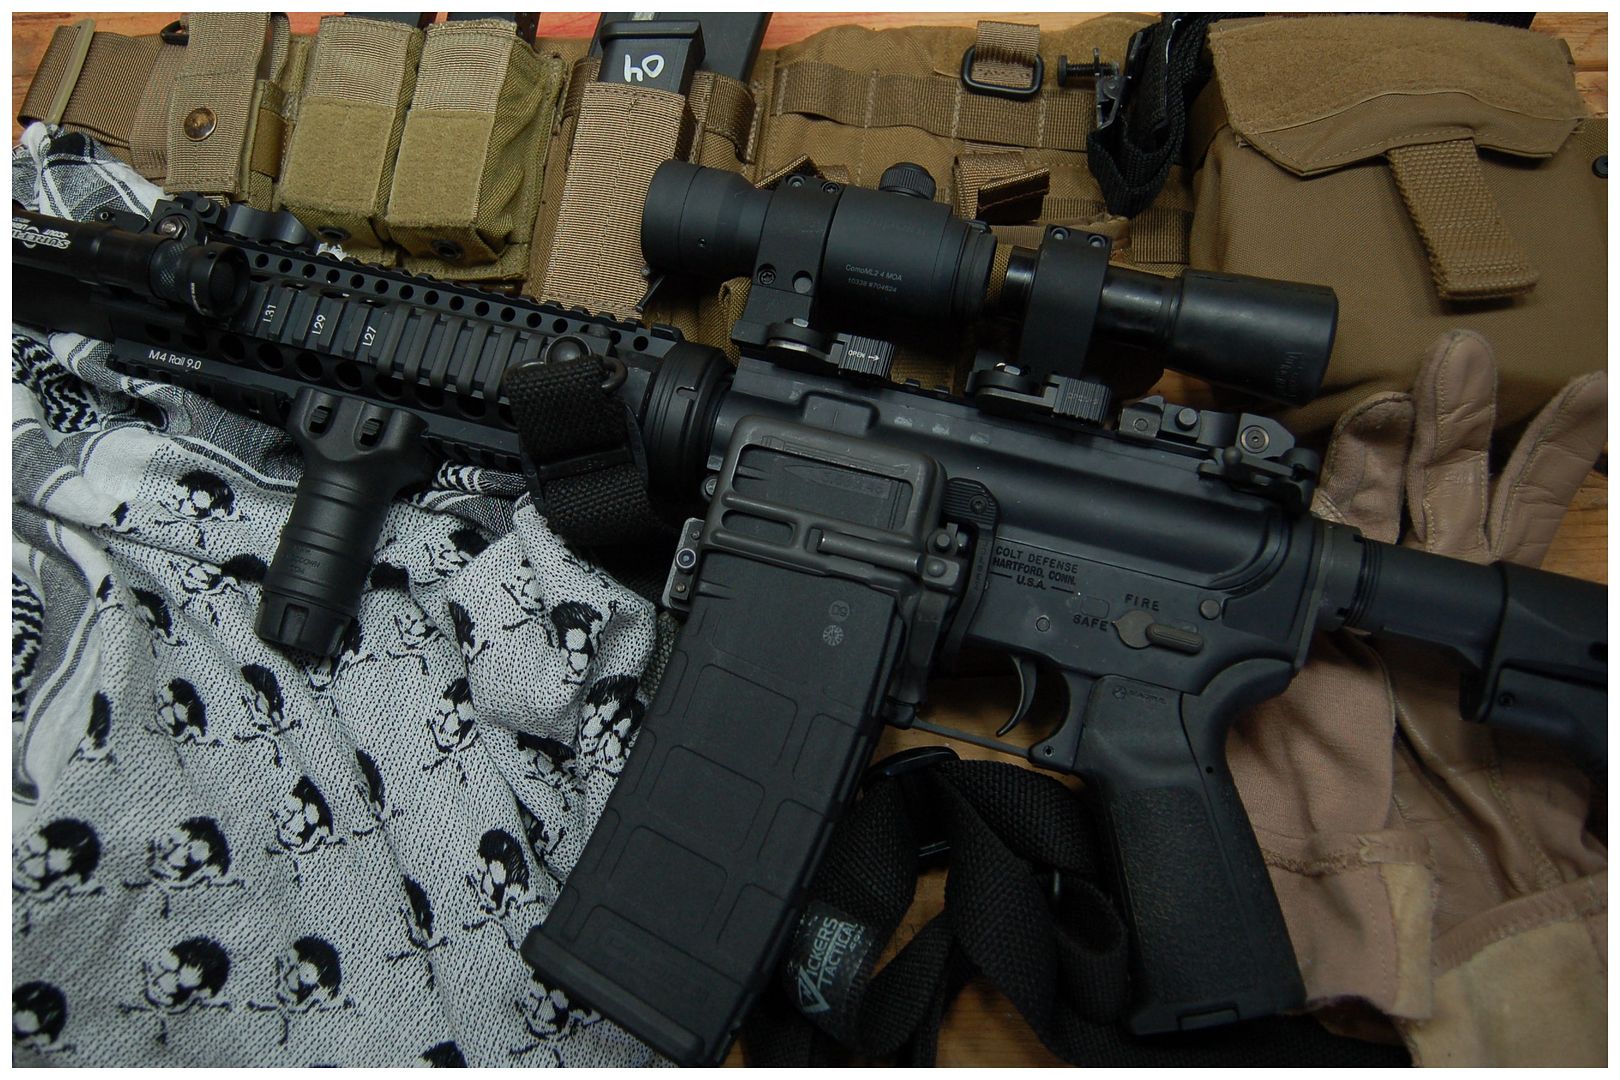
Yeah, that white-background look is something I'm trying hard to avoid, while at the same time avoiding the whole "I threw a bunch of tactical stuff on the floor and dropped a rifle on top of it" look. The old wire spindle I had at my old place worked great for that. Gave a texture to the background, the rusted metal pieces made a nice contrast, etc.
WWW.TACTICALYELLOWVISOR.NET

 Reply With Quote