

Results 301 to 315 of 732
Thread: Grip Stippling Thread
-
2 January 2016, 18:06 #301
 Battle Cock Tactical
- Join Date
- Nov 2013
- Location
- Battle Cock Tactical
- Posts
- 1,179
- Downloads
- 0
- Uploads
- 0
-
2 January 2016, 23:48 #302
Distinguished Member
- Join Date
- Nov 2013
- Location
- PNW
- Posts
- 1,752
- Downloads
- 0
- Uploads
- 0
That is badass, man.
"It's time to start slapping people." - George Carlin
NRA Life Member | SAF Life Member | FPC Member
ΜΟΛΩΝ ΛΑΒΕ
-
3 January 2016, 00:20 #303
Battle Cock Tactical
- Join Date
- Nov 2013
- Location
- Battle Cock Tactical
- Posts
- 1,179
- Downloads
- 0
- Uploads
- 0
Grip Stippling Thread
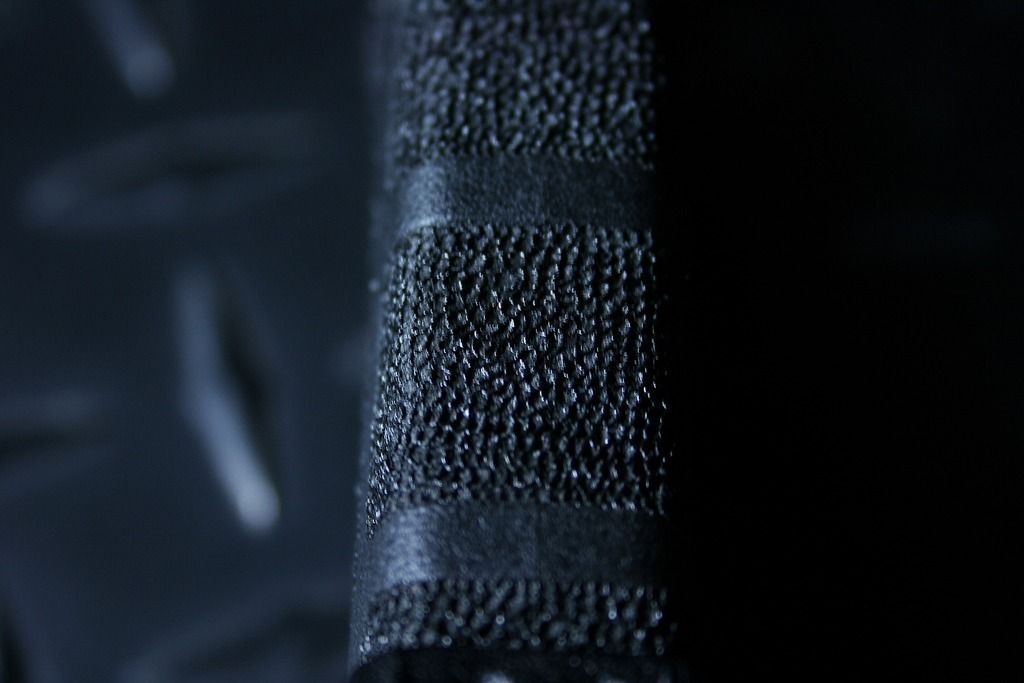
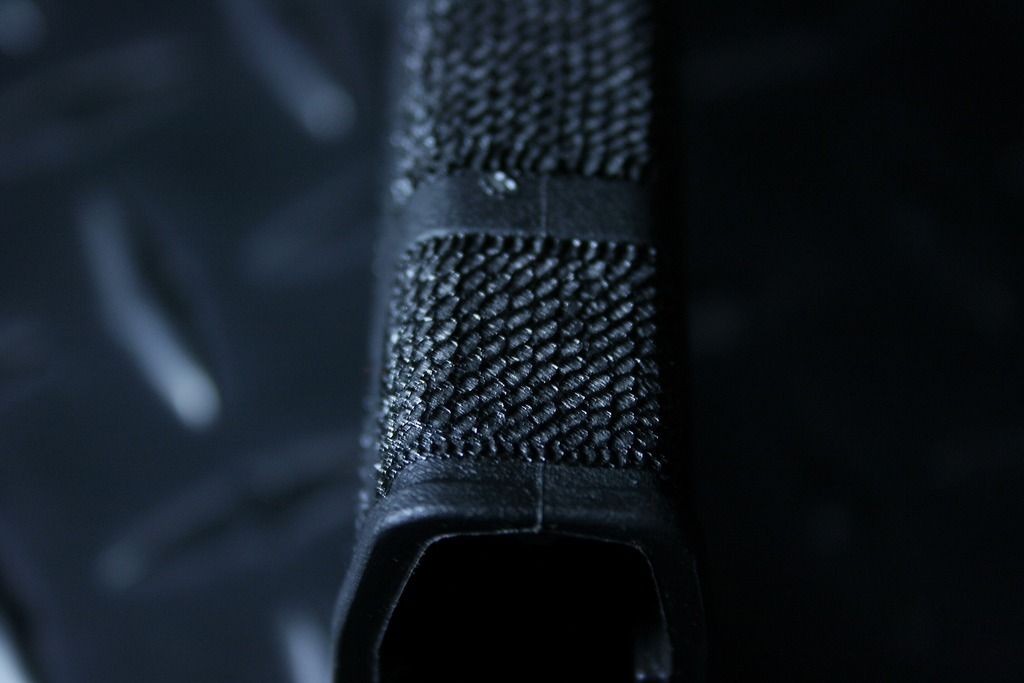
I love the nubbed down finger grooves on this thing. They no longer feel like they are trying to burrow in between your fingers, but I left enough on there to maintain all their benefits. Originally Posted by Deadwing

Here's a couple more shots of the gun.


-
3 January 2016, 00:48 #304
Distinguished Member
- Join Date
- Nov 2013
- Location
- PNW
- Posts
- 1,752
- Downloads
- 0
- Uploads
- 0
I normally can't stand Glock finger grooves, but i think i could learn to like those. The subdued nubs combined with the undercut trigger guard looks very comfortable.
How do you get the finish so smooth on the undercut?"It's time to start slapping people." - George Carlin
NRA Life Member | SAF Life Member | FPC Member
ΜΟΛΩΝ ΛΑΒΕ
-
3 January 2016, 01:03 #305
Battle Cock Tactical
- Join Date
- Nov 2013
- Location
- Battle Cock Tactical
- Posts
- 1,179
- Downloads
- 0
- Uploads
- 0
I put the frame in a vise to get the rough undercut as even as possible, then work from 120grit sandpaper up to 600-1500 depending on the finish I'm looking for. After that, I use a polishing compound to finish it. Originally Posted by Deadwing
-
3 January 2016, 01:10 #306
Distinguished Member
- Join Date
- Nov 2013
- Location
- PNW
- Posts
- 1,752
- Downloads
- 0
- Uploads
- 0
Interesting. I figured progressively finer grit sanding was involved, but I never would've guessed polishing compound was a part of the process. I guess i just never really thought about polishing polymer.
"It's time to start slapping people." - George Carlin
NRA Life Member | SAF Life Member | FPC Member
ΜΟΛΩΝ ΛΑΒΕ
-
3 January 2016, 01:17 #307
Battle Cock Tactical
- Join Date
- Nov 2013
- Location
- Battle Cock Tactical
- Posts
- 1,179
- Downloads
- 0
- Uploads
- 0
Grip Stippling Thread
Some guys polish their undercuts until they are glass smooth and very reflective. I tend to leave it smooth, but closer to the original luster. Originally Posted by Deadwing
On the above gun I also slightly contoured the finger grooves on the sides of the front strap to make them less blocky feeling up front.
-
3 January 2016, 01:36 #308
Distinguished Member
- Join Date
- Nov 2013
- Location
- PNW
- Posts
- 1,752
- Downloads
- 0
- Uploads
- 0
It's a shame Glock doesn't offer them from the factory that way. Originally Posted by Battle Cock
"It's time to start slapping people." - George Carlin
NRA Life Member | SAF Life Member | FPC Member
ΜΟΛΩΝ ΛΑΒΕ
-
3 January 2016, 10:03 #309
Battle Cock Tactical
- Join Date
- Nov 2013
- Location
- Battle Cock Tactical
- Posts
- 1,179
- Downloads
- 0
- Uploads
- 0
But then, what would I do for fun? Originally Posted by Deadwing

-
3 January 2016, 13:03 #310
Elite Member
- Join Date
- Dec 2009
- Posts
- 2,101
- Downloads
- 0
- Uploads
- 0
I like how you even radius the flat under the trigger guard. Very nice.
-One Nation, Under God
-"The bad news is time flies. The good news is you're the pilot." ~ Michael Althsuler
-
3 January 2016, 17:52 #311
Battle Cock Tactical
- Join Date
- Nov 2013
- Location
- Battle Cock Tactical
- Posts
- 1,179
- Downloads
- 0
- Uploads
- 0
Which part are you referring to? Originally Posted by Aragorn

-
4 January 2016, 18:20 #312
Distinguished Member
- Join Date
- Nov 2013
- Location
- PNW
- Posts
- 1,752
- Downloads
- 0
- Uploads
- 0
killer shot. Originally Posted by Battle Cock
"It's time to start slapping people." - George Carlin
NRA Life Member | SAF Life Member | FPC Member
ΜΟΛΩΝ ΛΑΒΕ
-
4 January 2016, 18:31 #313
Elite Member
- Join Date
- Dec 2009
- Posts
- 2,101
- Downloads
- 0
- Uploads
- 0
The stippled flat under the trigger guard. Looked like you even rounded the edges. Originally Posted by Battle Cock
-One Nation, Under God
-"The bad news is time flies. The good news is you're the pilot." ~ Michael Althsuler
-
4 January 2016, 18:37 #314
Battle Cock Tactical
- Join Date
- Nov 2013
- Location
- Battle Cock Tactical
- Posts
- 1,179
- Downloads
- 0
- Uploads
- 0
Ah yes. I've done more of a rounded edge on a couple previous jobs, but with this one being deeper, I decided to keep that feature less pronounced. I like the way it come out. Originally Posted by Aragorn
-
5 January 2016, 10:48 #315
Contributing Member
- Join Date
- Sep 2015
- Location
- Katy, TX
- Posts
- 412
- Downloads
- 0
- Uploads
- 0
Just wrapped up a few PMAGS and tried some new techniques. I tried to pay attention to how I oriented the tip to make a consistent pattern rather than make random holes like I have done in the past. While it required a little more time and brainpower, the end result made it all worth it. Gives it a much cleaner, professional look IMO.
Before
After


 Reply With Quote


