

Results 76 to 90 of 226
Thread: Photography How-to
-
17 December 2013, 17:52 #76
 Administrator
- Join Date
- Sep 2010
- Location
- PNW
- Posts
- 15,290
- Downloads
- 0
- Uploads
- 0
Dave,
Your 3D printing models again are excellent. What can't you make?
The photos look pretty good as well. Not bad for a broken camera. Personally, I like the Alien Bee lights. They are cost effective (compared to other professional lights) and I was turned onto them by Roy from Weapon Outfitters. Might want to look into those.
-
18 December 2013, 10:22 #77
Distinguished Member
- Join Date
- Dec 2009
- Location
- Colorado
- Posts
- 1,104
- Downloads
- 0
- Uploads
- 0
Thanks man! The skull is Lentil's, a French Bulldog born with a cleft palate:
My Name is Lentil on Facebook
We used imagery from a CT scan to create a 3D model, cleaned it up and printed it for his foster mom.
We've been pursuing work in the medical industry in addition to prototyping and other kinds of work. It's pretty amazing stuff.
I will look into the Alien Bee lights. Thanks for the tip!
I brought my camera rig home for the holidaze. I'm going to practice a lot so expect more photos soon
-
2 January 2014, 16:18 #78
Distinguished Member
- Join Date
- Dec 2009
- Location
- Colorado
- Posts
- 1,104
- Downloads
- 0
- Uploads
- 0
I found a great series of videos that explains a ton about product photography. These answered so many questions for me! From setting up the camera to advanced post-production there is something here for everyone.
I learned how to use Tethered Shooting (camera attached to computer) with my Canon over the holiday. It makes a WORLD of difference. Now I can get my shots much closer to how I see them in my head with a lot less time and effort
Here's a preview. This is the first of 7 videos:
-
31 March 2014, 08:21 #79
Almost Tactical Gear Reviews
- Join Date
- Feb 2012
- Posts
- 151
- Downloads
- 0
- Uploads
- 0
Awesome thread, thanks to UWone77 for pointing it out. The schedule 40 idea is awesome, I built mine out of 2x4s and made it too dang short. The biggest issue I have had is finding paper locally that is wide enough to fill in behind a rifle and shoot angles.
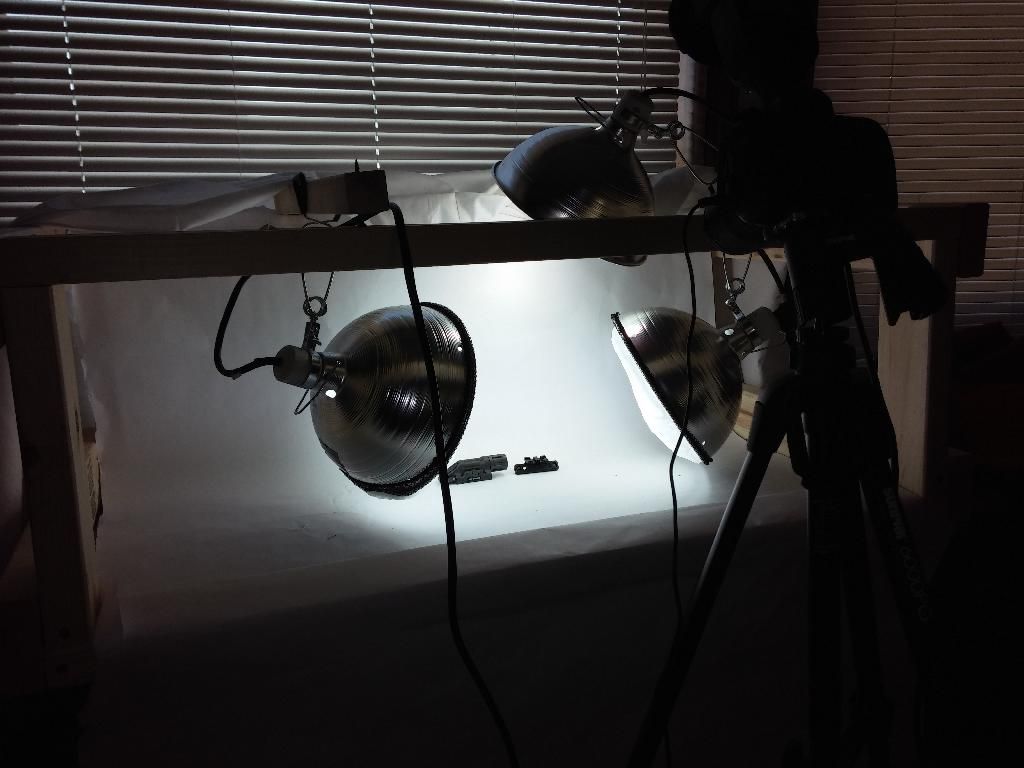
For my full rifle shots I have a white piece of paper on the wall and I shine two 100 watt daylight bulbs on it and one on the rifle. The red circles are on the background the green is on the rifle.

The rifle is hanging about 3 or 4 foot in front of the paper from my rafters by black fishing line that I patch out with Gimp. Here is the results from that shot from above.

For blackgrounds I use a felt cloth that drops down over my paper and then I drop down two windshield shades that I found in the basement to block light from my background. I stapled them together and them stapled them to the rafter directly above the rifle. A light is placed right in front of it facing down on the rifle. I have also started putting one one the ground and using a box covered with a black cloth to direct it up to highlight the features a littke better. Here is the setup and a result picture. The autoshade hasn't been edited out yet so you can see how close I get it.
]
The extra light really helps

I use a Canon 60D and use a Macro lens for nearly everything since it is so crisp and has my widest field of view.
I am playing with a new way of getting shadowless photos on a white background also. Hanging them works good for complete rifles but isn't great for accessories.
-
31 March 2014, 08:56 #80
Moderator
- Join Date
- Apr 2009
- Location
- Central Florida - Gulf Side
- Posts
- 2,229
- Downloads
- 2
- Uploads
- 2
I agree. I had been looking at the Bees for awhile. This year, the Wife gave me an early B'day present - a pair of B800's with air-cushioned light stands and umbrellas. I have been shooting with continuous lighting for decades, and I can't believe the difference strobes make. I've only had them a couple of weeks, so I'm still learning, but I really like them. Originally Posted by UWone77
 NRA Benefactor Member
NRA Certified Instructor
"I won't be wronged, I won't be insulted, and I won't be laid a hand on."
John Wayne - "The Shootist"
-
31 March 2014, 13:45 #81
Distinguished Member
- Join Date
- Dec 2009
- Location
- Colorado
- Posts
- 1,104
- Downloads
- 0
- Uploads
- 0
Thanks for posting your setup DMViergever. I have been thinking along the same lines, suspending a full rifle with floss or fishing line ...
I did some research a while back into LED lights. They work so well for handhelds lights, too bad they suck for photography!
-
31 March 2014, 14:42 #82
Almost Tactical Gear Reviews
- Join Date
- Feb 2012
- Posts
- 151
- Downloads
- 0
- Uploads
- 0
For lighting I use heat lamps like you would for a chicken coop. I got them at wal-mart for like 10 bucks a piece. The bigger they are the further the bulb sits back in there and the better the light seems to work. As was said above, getting daylight bulbs and the same brand is very important. Some of my 100 watt are the GE brand and others are great value. Great value has a yellow tint where GE has a good clean white. I haven't seen the GE in stock again in a while or I would buy some. I diffuse with thin white cloth or I bought some 10 inch diffusers that have like a hair net sewn on that makes it stay put. Originally Posted by MoxyDave
ETA: i might save up for the bee lights.
-
13 April 2014, 19:58 #83
Distinguished Member
- Join Date
- Dec 2012
- Location
- Missouri
- Posts
- 1,746
- Downloads
- 15
- Uploads
- 0
Well my first attempts at making a lightbox. Need to get some brighter bulbs that is for sure but with some processing afterwards we get a decent picture.... not professional but decent

-
14 April 2014, 12:32 #84
Administrator
- Join Date
- Sep 2010
- Location
- PNW
- Posts
- 15,290
- Downloads
- 0
- Uploads
- 0
You guys are pretty creative on the lighting!
-
16 April 2014, 08:59 #85
Almost Tactical Gear Reviews
- Join Date
- Feb 2012
- Posts
- 151
- Downloads
- 0
- Uploads
- 0
Haha creative is probably a kind way of putting it! I like the brick idea though! Originally Posted by UWone77
-
16 April 2014, 11:42 #86
Distinguished Member
- Join Date
- Dec 2012
- Location
- Missouri
- Posts
- 1,746
- Downloads
- 15
- Uploads
- 0
Originally Posted by DMViergever
Haha I just grabbed what was available. Gonna make some PVC adjustable stands soon.
Sent from my Nokia Lumia Icon using TapatalkJust a regular guy.
-
16 April 2014, 19:36 #87
Almost Tactical Gear Reviews
- Join Date
- Feb 2012
- Posts
- 151
- Downloads
- 0
- Uploads
- 0
I was being serious, I shoot a lot of different objects and am always moving and adjusting lights. You see what I use, big chairs and bar stools haha. I like the brick idea for sure. Originally Posted by Computalotapus
-
4 June 2014, 20:30 #88
Administrator
- Join Date
- Sep 2010
- Location
- PNW
- Posts
- 15,290
- Downloads
- 0
- Uploads
- 0
I keep getting messages about photography, so I'm just going to bump this thread as there is a lot more information here than I could give out. Please remember I am very much an amateur much like the rest of you guys, so we're all learning from each other.
Maybe some of the actual professionals will chime in this thread more...
-
4 June 2014, 20:52 #89
Distinguished Member
- Join Date
- Apr 2014
- Posts
- 1,940
- Downloads
- 3
- Uploads
- 0
Subscribed. Was looking for this one.
-
5 June 2014, 08:22 #90
WEVO Staff Photographer
- Join Date
- Nov 2013
- Location
- SE MI
- Posts
- 4,571
- Downloads
- 2
- Uploads
- 0
There are some GREAT tips in here! Glad I stumbled in!
Thanks UWone77 for the bump.Ground Defense 1, Blade Defense 1, Defensive Pistol 1 & 2, Aliance Shoot House, When Things Go Bad, YSINTG, Carbine 1, DART Medical, NRA Range Safety Officer
david@damagephotos.com
Damage Photos on Facebook
@damage_photos on Instagram
Use DAMAGE15 to save 15% at Third Pin Threads
Save 10% "JOINORDIE" http://cmttac.com/


 Reply With Quote


